

Regardless of whether you like the new Timeline or not, Facebook Fan Pages are officially switching over to the new Timeline profile on March 30, 2012. This means that if your brand has a Facebook Page, you will need to revamp and re-customize it to fit the new design. The switch to Timeline can be a confusing transition: in addition to the significant changes to appearance and navigation, Timeline poses new rules and restrictions to how brands will be able to market themselves on Facebook.
So what to do? Mindspike has prepared “Facebook Timeline For Dummies” – a simple guide that outlines the top 5 things you need to know about Facebook Timeline for your brand.
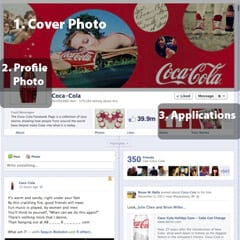
1. Your Brand’s Cover Photo
If you’re familiar with Timeline, you’ve noticed that a major change of the layout is the large cover photo that appears at the top. This is significant because brands will now have the capability to showcase a large, visually striking element to visitors as soon as they reach the page. Timeline cover photos will have a pixel size of 851 x 315.
There are several restrictions to the cover photo, which brands must adhere to, or run the risk of getting the ban-hammer. A brand’s cover photo may NOT contain any of the following:
1). Any price or purchase information
2). Any contact information (e-mail, phone, website, social media links)
3). Any calls to action (“Come buy this”, “Win this prize”, “50% off”)
4). Any references to Facebook features (“Like us”, etc.)
These rules apply to the profile picture as well. The best advice moving forward? If your picture resembles an ad, don’t use it.
2. Your Brand’s Profile Picture
Just as with your current Brand Page, Timeline will allow you to have a profile picture. The difference? It’s much smaller. The new size is 180 x 180 pixels, but the displayed thumbnail size will only be 32 x 32.
3. Tab Changes a.k.a. Say Goodbye To Your Landing Page
Your custom landing page used to be the first thing visitors saw. However, with Timeline, this will sadly be no more. All visitors to your page will see the same page layout – regardless of whether they are fans or not.
Your Application Tabs have been replaced by a series of square icons located directly underneath your cover image. Four applications will be displayed – if you have more than four, users can access them by clicking on the drop down arrow to the right of the boxes. Since these additional apps will require an additional click to see, they won’t receive the same visibility as the four apps that are constantly displayed. This is important – you must choose which apps are the most essential for your brand, because those will be the only ones highlighted in your application banner.
The nice thing about this change? You can now choose which of your apps appear and adjust the order they appear in, with the exception of photos, which will always appear first. Doing this is easy: Expand the view of your app menu by clicking on the arrow to the right of your app bar. Click the pencil icon that appears to edit the positions of your apps.
4. Pinned Posts
This is a pretty sweet feature – completely new and unique to Timeline. All posts by your brand can now be “pinned” by your page’s admins, which will stick particular posts to the top of your page for up to seven days. This is an excellent way to highlight important, buzzworthy posts to the top of your timeline for longer promotion and visibility. How to pin a post? Simply go to a post on your page and click “edit” –> “pin to top”.
5. Add Milestones
With Timeline, you can add important events relevant to the history of your brand on your page. Milestones like “opening day”, or when your business was founded adds a storyline to your brand – you can even add funny events or amusing dates to your milestones if you wish.
5. Fan Messaging
Timeline now allows fans of your page the ability to send private messages to your brand directly, in the same way an individual can send a private message to a Facebook friend. This is a great way to provide customer service to your consumer base, as individuals will now be able to utilize Facebook to send your brand messages outside the public forum of your Facebook Wall.
However, if you don’t want to be contacted by your fans, you can disable this feature by going to your admin panel and clicking “Manage” –> “Edit Page” –> “Manage Permissions” and then unchecking the box titled “Messages“.
There you have it! The switch to Timeline can be confusing; but if you’re prepared for the necessary changes, the new layout will both benefit and help your business in more ways than one.